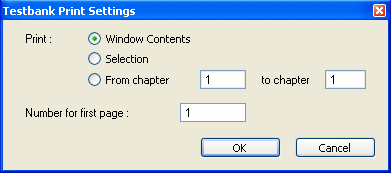
When you want to print a question, a group of questions, a section, or a chapter from a testbank, you need to open the testbank in the testbank editing window. Then select "Print" from the File menu to display the Testbank Print Settings dialog.

The Testbank Print Settings dialog has the following options:
This option prints only what you see currently displayed in the testbank window. If only the chapter titles are displayed, it will print only the titles. If any chapters or sections are "open" to display questions, what is displayed will be printed, along with any chapter or section titles. If question IDs are displayed, only the IDs will print, along with any chapter or section titles.
This option prints only those testbank questions that are selected in the testbank. To select items in Question view or ID view, hold down the [Shift] or [Control] key and click one or more questions or question IDs. If you select a chapter or section title instead of individual questions, then all the questions in the selected chapter(s) or section(s) will be printed.
This option lets you print all the questions from one or more chapters in the selected testbank. Click the radio button and enter a single chapter number or a range of chapter numbers to print. Note that questions print with answers and descriptors only if you have this information displayed on-screen. You can select which items are displayed by selecting "Preferences > Testbank Options" from the Tools menu.
Enter a starting number for the page numbers that will print in headers or footers you have set up to include automatic page numbering.
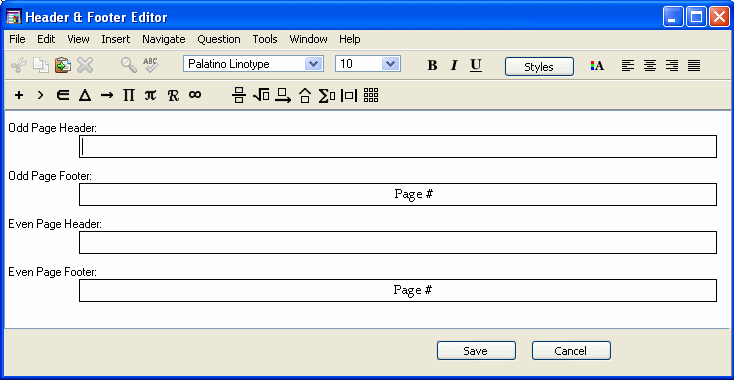
You can customize what appears in the headers and footers for printed testbank pages. When you have selected a section heading or question in a testbank in the Testbank Library, select "Header-Footer Editor" from the Tools menu to open an editing window.

Whatever you put in this field appears at the top of page 1 and every odd-numbered testbank page that is printed.
Whatever you put in this field appears at the bottom of page 1 and every odd-numbered testbank page that is printed.
Headers and footers may include text as well as graphics, tables, and symbols. Select "Toolbars" from the View menu to display the Standard toolbar, the Text Formatting toolbar, or the Equation Editing toolbar. You can also select "Show Rulers" from the View menu if you need to set tabs or adjust alignment.
You may want headers and footers to include automatic page numbers or the current date or the chapter number. Select these items from the Insert menu to insert placeholders that will be replaced with the appropriate numbers as the testbank prints. (The placeholder for chapter number is "99.")
To close the Header & Footer Editor and save your changes for the current testbank, click Save or select "Close" from the File menu. To save the headers and footers as the new default to be used for future testbank printing, click Save as Default. Click Cancel to close the window without making any changes.
If you want to set the paper size, margins, orientation, or scaling that will be used when you print a testbank, select "Page Setup" from the File menu. This is the standard Page Setup dialog for your printer.