Follow these steps to create a test in TestGen and transfer it into Web CE 6.x (Campus Edition) and WebCT Vista® 4.x. Tests exported for these platforms are in QTI format and are compatible with other QTI-compliant systems as well.
Select "New test" from the File menu. On the Startup screen, click Web Test. Then choose either the QTI (WebCT CE 6.x and WebCT Vista) option and click OK.
Create the test, whether choosing from a testbank or adding your own questions.
Select "Export" from the File menu, select the QTI (WebCT CE 6, WebCT Vista) option on the Export dialog box, and click OK.
The "Create a file for export" dialog box displays.
Save the test export file as a zip file. Review the filename and destination where the .zip file will be saved. (By default, the name matches its original .TST file and the saved location is the TestGen "Tests" folder.) You can change the destination, if desired, but note that you will later need to locate the file for importing it into WebCT.
Click Save.
Log into your WebCT course, click the Build tab, and select either the Basic or Power view.
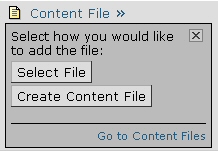
In the left-hand column, click Content File. Then click the Select File button.
In the File Browser, click Upload File.
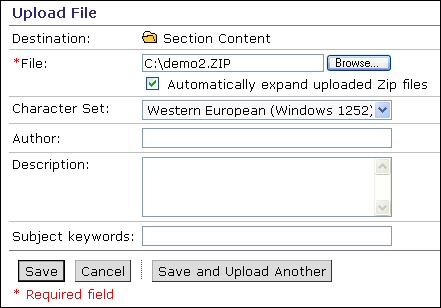
In the Upload File dialog, click the Browse button to locate the .zip file you exported from TestGen.. (Tip: It might be in the "Tests" folder inside the TestGen folder.) Check the box to Automatically expand uploaded Zip files.
Click the Save button. TestGen files will be uploaded into the Section Content folder. WebCT unzips the files to a subdirectory using the same name as the zip file.
After uploading the content file, return to the Basic or Power View and click the Content Import button in the upper right portion of the screen.
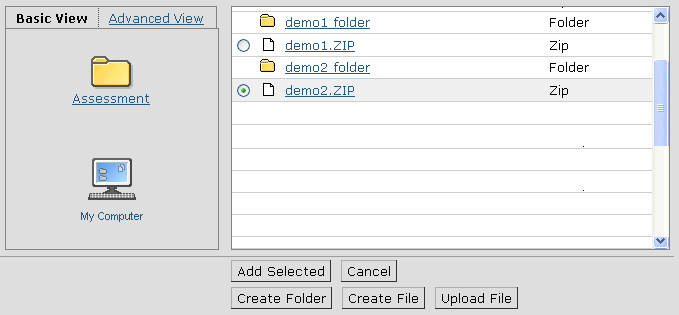
In the File Browser, select the zip file you just uploaded and click Add Selected.
The questions in the zip file will be added to the Question Database.
Click the Return button to go back to your Home page.
Refer to the WebCT help for instructions on creating an assessment. When creating a quiz or survey, you can view and select from existing questions in the category name based on the .zip file you exported from TestGen.